You should rarely attempt to remove a dermal piercing at home without tool — seek a pro when possible.
Although piercing is trendy, it can also be harmful. I do not like piercing just for fashion or trends.
In this guide, I will explain when and how to remove a dermal piercing at home without tool, what to avoid, and when you should stop and see an expert.
You will get clear steps, warning signs, and honest personal tips so you can make an informed decision about removing a dermal piercing at home without tools.
Why removing a dermal piercing at home without tool is risky
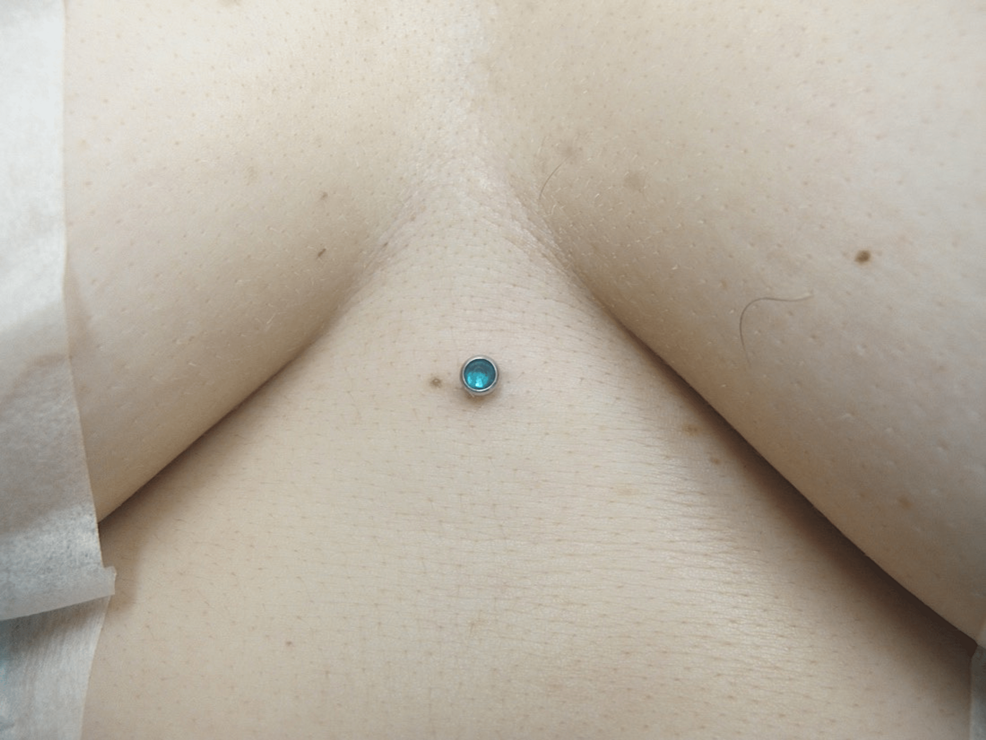
Dermal anchors sit beneath the skin with a base designed to stay in place. Trying how to remove dermal piercing at home without tool can tear tissue, cause infection, or leave scarred skin.
Most professional removals require sterile instruments and training. Attempting removal without tools increases chances of complications and poor healing.

When it might be acceptable to consider removal at home
There are rare, specific situations where learning how to remove dermal piercing at home without tool may be reasonable.
- The piercing is fully healed, sits superficially, and the top is loose or unscrews by hand.
- You have immediate access to a clean environment and sterile supplies.
- You understand you must stop if you meet resistance, pain spikes, or bleeding increases.
If any doubt remains, seeking a piercer or medical professional is the safest choice. How to remove dermal piercing at home without tool should only be considered as a last resort or temporary measure.

Preparing safely before attempting removal without tools
Preparation greatly lowers risk when you consider how to remove dermal piercing at home without tool. Follow these steps before touching the area.
- Clean space: Work in a well-lit, clean room. Lay down a fresh towel.
- Hand hygiene: Wash hands thoroughly and wear sterile gloves.
- Supplies: Sterile saline or wound wash, alcohol wipes, sterile gauze, clean mirror, small flashlight, antiseptic ointment, trash bag for disposal.
- Comfort: Sit steady with good lighting and someone nearby if you faint or need help.
- Know red flags: Intense pain, spreading redness, fever, heavy bleeding, pus, or unexpected numbness. Stop immediately if these occur.
Being well-prepared helps you proceed cautiously when you attempt how to remove dermal piercing at home without tool.

Step-by-step: a conservative, non-surgical method
If you decide to proceed with how to remove dermal piercing at home without tool, follow a conservative, non-invasive method. Do not cut skin or force the anchor out.
- Clean: Wash the area gently with saline. Pat dry with sterile gauze.
- Warm compress: Apply a warm, sterile compress for 5–10 minutes to soften tissue and reduce adhesion.
- Inspect: Use a mirror and flashlight to confirm the top and post are visible and not buried.
- Sterile gloves: Put on gloves. Disinfect your fingers with alcohol wipes.
- Unscrew the top: If the top is threaded and loose, hold the base steady with one finger and gently twist the top counterclockwise with another finger. Do not twist hard.
- Gentle traction: If the top comes off, tug the post gently in line with the channel. Use slow, steady pressure. If you feel resistance or pain, stop.
- Stop if stuck: If the anchor does not move with gentle traction, do not pull harder. Cover the area with sterile gauze and seek professional removal.
This approach to how to remove dermal piercing at home without tool limits tissue damage. Forcing an anchor will likely cause bigger problems than leaving it in temporarily.

Aftercare and what to watch for
Good aftercare prevents infection and helps the site heal if you removed the jewelry yourself.
- Clean twice daily with saline for 7–14 days.
- Apply a thin layer of antiseptic ointment if recommended by a clinician.
- Keep the site dry and avoid makeup, lotions, or sunscreen on the wound for the first week.
- Watch for infection signs: increased redness, warmth, swelling, pus, or fever. Seek medical care if these appear.
Document the site with photos so you can track healing and show a clinician if needed. Proper aftercare is essential after any attempt to learn how to remove dermal piercing at home without tool.
Alternatives to removing a dermal piercing at home without tool
Choosing a professional alternative is usually safer and faster. Consider these options.
- Return to your original piercer: They can remove anchors cleanly and with minimal scar.
- See a dermatologist or doctor: Medical removal is best if there’s infection or deep embedment.
- Minor in-office procedures: A clinician can perform a local anesthetic and small incision for safe removal.
If cost is a concern, contact local piercing shops or clinics for low-cost options rather than risking a home removal.
Personal experience: lessons, mistakes, and practical tips
I once advised a client who tried to pull a microdermal out at home and ended up with a deeper embedded anchor and infection. The key lessons I learned and share are simple.
- Don’t rush: Take time to prepare and decide. Rushing increases mistakes.
- Stop early: If the jewelry does not come out with gentle traction, stop and see a professional.
- Clean first: Almost all problems from DIY removal come from inadequate sterilization.
When thinking about how to remove dermal piercing at home without tool, be humble about what you don’t know and quick to seek help.
Quick PAA-style questions
Q: Can I pull out a dermal piercing at home?
A: You can only safely try gentle unscrewing or mild traction when the piece is fully healed and loose; otherwise see a pro.
Q: Will removing a dermal piercing at home cause a scar?
A: Any removal can leave a scar; forcing removal or causing infection increases scarring risk.
Q: How long after removal does the hole heal?
A: Small wounds usually start closing in days and can take weeks to fully mature; depth and care affect timing.
Frequently Asked Questions of how to remove dermal piercing at home without tool
What is the safest way to remove a dermal piercing at home without tool?
The safest way is to avoid removing it if it’s not loose. If the top is fully unscrewing by hand, gently twist and pull in line with the skin. Stop immediately if you hit resistance.
Can I remove a dermal anchor by pulling it out?
Pulling an embedded dermal anchor out can tear tissue and cause infection; only try gentle traction if the post moves easily and pain is minimal.
What signs mean I should see a doctor instead of removing it myself?
Seek medical help for heavy bleeding, spreading redness, fever, pus, severe pain, or if the jewelry is deeply embedded and does not budge with gentle effort.
Will removing a dermal piercing at home without sterile tools cause infection?
Yes, using non-sterile hands or space raises infection risk significantly; proper sterile technique lowers but does not eliminate risk.
If the top falls off, can I just leave the anchor inside?
Leaving the anchor temporarily is acceptable if professional removal is possible soon. Keep the area clean and covered, and schedule removal with a piercer or doctor.
How can I minimize scarring after removing a dermal piercing at home without tool?
Clean the wound, avoid trauma, use recommended topical treatments, and protect it from sun. If scarring is a concern, consult a dermatologist for scar-minimizing options.
Conclusion
Removing a dermal piercing at home without tool carries real risks, but cautious, informed action can reduce harm when a professional is not available. Prepare carefully, follow conservative steps, and stop at the first sign of trouble. If you’re uncertain, get professional help — it often saves time, money, and health in the long run.
Take action now: evaluate your piercing, gather supplies, and if you have any red flags, book an appointment with a piercer or clinician. Share your experience or questions below to help others make safer choices.