Group cords by device, coil gently, label clearly, and pack in a smart organizer.
You know that moment at airport security when a nest of cords spills from your backpack? Chargers tangle with earbuds. Your laptop cable knots around your power bank. The gate agent calls final boarding while you hunt for the right USB-C. I’ve been there. That chaos ends the moment you build a simple system. In this guide, I’ll show you how to organize cables for travel so you save space, avoid tangles, pass TSA stress-free, and always find the right cord fast. I’ll also share my tested picks for cable organizers that make your carry-on cleaner and your travel day calmer.
FYY Large Double-Layer Cable Organizer

This large FYY organizer gives you space and structure in one bag. The double-layer build separates cables from bricks and accessories. Elastic loops keep cords tidy, while mesh pockets hold adapters, SD cards, and earbuds. A semi-rigid shell helps protect what is inside during travel.
I like this size for longer trips or multi-device pros. It swallows a laptop charger, USB-C PD brick, a compact power strip, and more. The water-resistant fabric adds peace of mind. Zippers feel smooth and the stitching is solid for the price.
Pros:
- Two layers make sorting quick and clear
- Large capacity for chargers, cables, and power banks
- Elastic loops prevent tangles and cable strain
- Mesh pockets secure small items and adapters
- Water-resistant fabric for everyday travel
- Semi-rigid shell adds light protection
- Great value for the space provided
Cons:
- Large size may be bulky in a small backpack
- No hard-shell drop protection
- Not ideal for ultra-minimalists
My Recommendation
If you carry a laptop, tablet, phone, and camera, this case fits that lifestyle. It is perfect if you need to know how to organize cables for travel with zero guesswork. The layout is simple. The capacity is forgiving. The price is fair for what you get.
| Best for | Why |
|---|---|
| Business travelers | Holds laptop chargers, dongles, and presentation tools |
| Content creators | Fits SD cards, readers, mic cables, and battery packs |
| Family trips | One bag for everyone’s cords avoids clutter |
FYY Double-Layer Travel Cable Pouch
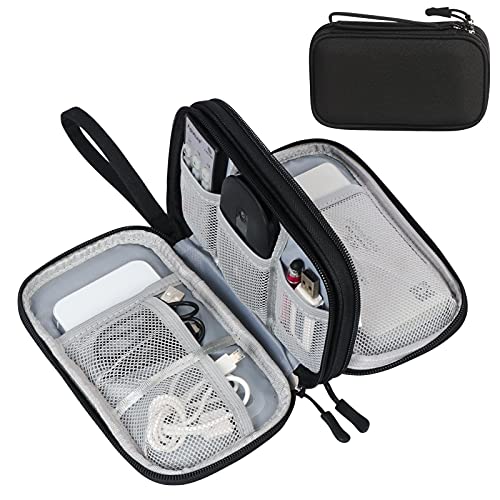
This FYY travel pouch is slimmer but still structured. It keeps your daily cords and a small charger neat and easy to reach. Elastic bands and mesh pockets stop items from sliding around. The shell helps the pouch hold its shape in your bag.
It shines for commuters and weekend trips. I can fit a phone charger, earbuds, USB-C cable, and a compact GaN brick. The water-resistant exterior is a welcome touch in light rain. If you value a tidy, low-bulk setup, this hits the mark.
Pros:
- Slim and packable for small bags
- Double-layer layout organizes by size and use
- Elastic loops reduce tangles and wear
- Mesh pockets for small parts and adapters
- Water-resistant fabric for travel days
- Structured shell keeps shape in transit
Cons:
- Less capacity for bulky laptop bricks
- Too small for heavy camera kits
- No hard-shell impact protection
My Recommendation
If you want to learn how to organize cables for travel without carrying a large case, start here. It suits light packers and short trips. It keeps the essentials neat and easy to find. It costs less but still feels solid.
| Best for | Why |
|---|---|
| Minimalists | Holds only what you need in a compact form |
| Daily commuters | Slides into a backpack without bulk |
| Weekend travelers | Perfect size for a few cables and a charger |
A Pro’s Guide: How to Organize Cables for Travel (2026 Edition)
I test gear for a living. I also fly a lot. Over time, I built a simple system that keeps my cables tidy. You can use this system today. It works for any trip, and any bag.
My goal is speed and calm. I want to reach for one cable and get it fast. No digging. No tangles. No stress. Here’s how to organize cables for travel like a pro.
Step 1: Make a simple gear map
List your devices. Phone, laptop, tablet, earbuds, camera, watch, e-reader, game console. Write them down. Under each device, list what they need. Cable type. Charger wattage. Any adapters.
- Phone: USB-C to USB-C, 30–45W charger
- Laptop: USB-C PD 65–100W or OEM brick
- Earbuds: USB-C or Lightning (older models)
- Watch: Magnetic puck or USB-C dock
- Camera: SD reader, USB-C cable, battery charger
This map prevents last-minute misses. It also helps you cut extras. This is the foundation for how to organize cables for travel.
Step 2: Standardize whenever possible
As of 2026, most new phones, tablets, and many laptops use USB-C. Get USB-C cables in two lengths: short (0.5–1 ft) and long (6 ft). Use a high-quality USB-C PD charger (GaN) with multiple ports. This reduces the number of bricks you carry.
For cameras or older gear, add only the cables you need. If you switch to a USB-C card reader, you cut another legacy cable. Standardize now. Pack less later. That’s how to organize cables for travel with less weight.
Step 3: Choose the right organizer
Your case should match your gear map. If you carry many items, use a double-layer case like the FYY Large Double-Layer Cable Organizer. If you carry less, use a slim pouch like the FYY Double-Layer Travel Cable Pouch.
Look for these features:
- Elastic loops to hold cables without pinching
- Mesh pockets for small items (SD cards, SIM tool)
- Water-resistant fabric for light rain
- Semi-rigid shell to keep shape
- Double zippers for quick access
This is the hardware part of how to organize cables for travel. The right case removes friction. It also makes packing a habit you’ll keep.
Step 4: Coil cables the right way
Bad coils damage cables. Good coils protect them. Use the over-under method. It reduces twist and strain. If that feels complex, do simple loose circles with no tight bends.
- Avoid tight loops under 2 inches in diameter
- Use Velcro ties, not rubber bands
- Keep strain reliefs straight, not kinked
Label each cable near one end. A small tag with “Phone”, “Laptop”, or “Camera” is enough. Clear labels are a secret sauce in how to organize cables for travel.
Step 5: Pack by use case, not by category
Most people group all cables together. I group by when I use them. This one change saves time during travel.
- In-flight pouch: phone cable, earbuds, small charger, power bank
- Hotel pouch: multi-port charger, long cable, power strip
- Work pouch: laptop charger, USB-C hub, HDMI adapter
Put the in-flight items in a quick-access pocket. Put the hotel and work items deeper. This is practical, simple, and the best answer for how to organize cables for travel on long days.
Step 6: Build a pre-trip checklist
Use a small checklist before you leave. It takes two minutes. It prevents the biggest misses. Tape this in your closet or save it in notes.
- Phone cable + wall charger
- Laptop charger + spare USB-C cable
- Power bank (carry-on, not checked)
- International adapter (if needed)
- SD reader + spare card
- SIM tool + eSIM plan ready
Check, pack, go. If you repeat this, you never forget the essentials. That is the heart of how to organize cables for travel with less stress.
Step 7: Safety, rules, and security
Airlines require lithium power banks in carry-on, not checked bags. Keep them accessible for security checks. Coiling and bagging cables also speeds up screening. Avoid packing loose cords that can snag and tear.
If you travel internationally, pack a compact universal adapter. Choose one with USB-C PD output to cut one more charger. For hotel rooms with limited outlets, bring a small travel power strip with surge protection. This supports how to organize cables for travel when outlets are scarce.
Step 8: Simplify with smart tech
One GaN charger with 65–100W can replace multiple bricks. Look for USB-C PD 3.1 support for laptops and tablets. Choose premium cables rated for high wattage. They last longer and charge faster.
Color-code cables. Red for laptop, blue for phone, green for camera. Or add small colored bands. You will find the right cord faster. This simple trick keeps how to organize cables for travel easy to maintain.
Step 9: Maintain and refresh
After each trip, do a quick audit. Toss damaged cables. Wipe the organizer. Update your checklist if something kept annoying you. Maintenance takes five minutes. It saves hours down the road.
Every six months, review your setup. Tech changes. Your needs change too. Keep the system lean. That’s how to organize cables for travel that stays current in 2026 and beyond.
What to Pack: Cable and Accessory Essentials
Here is a simple starter pack that works for most travelers. Adjust to your devices. Keep it lean.
- Two USB-C to USB-C cables: one short, one long
- One USB-C to Lightning (only if you still need it)
- One multi-port GaN charger (65–100W with 2–3 ports)
- One compact power strip with surge protection
- One power bank (20,000 mAh max for most airlines)
- One USB-C card reader (if you use a camera)
- One universal travel adapter for international trips
- Velcro ties and two spare cable tags
Pack these by use case as mentioned earlier. This is a practical path for how to organize cables for travel for business and leisure.
Scenario Playbook: Real-Life Packing Examples
Business overnight trip
- In-flight pouch: earbuds, short USB-C cable, phone charger
- Work pouch: laptop charger, USB-C hub, HDMI adapter
- Hotel pouch: multi-port GaN charger, long USB-C cable
Time saved at every step. No mess at security. No hunting in the hotel room. This is how to organize cables for travel when time is tight.
Two-week international vacation
- In-flight pouch: earbuds, phone cable, power bank
- Family pouch: multi-port charger, two long cables, travel power strip
- Camera pouch: two USB-C cables, SD reader, spare batteries
Each pouch has a role. You open only the one you need. The system scales easily. That is why learning how to organize cables for travel pays off on long trips.
Creator on the road
- In-flight pouch: ANC earbuds, short USB-C cable, 30W charger
- Editing pouch: 100W GaN charger, 2x USB-C cables, SSD, SD readers
- Shoot pouch: mic cables, camera battery charger, USB-C to micro cables
You will never mix up gear again. Label everything. Keep backups. Stay light yet ready. This is how to organize cables for travel when work is on the line.
Common Mistakes (And Easy Fixes)
- Carrying too many cables: Standardize to USB-C where you can
- Tight coiling: Use loose loops or over-under to prevent strain
- No labels: Add small tags to cut search time in half
- One giant pouch: Split by use so you never unpack everything
- Wrong charger: Bring one GaN that covers peak wattage
- Checking power banks: Keep batteries in carry-on
Avoid these and your system gets simple. These small habits define how to organize cables for travel without stress.
Choosing Quality Cables (Worth It in 2026)
Good cables charge faster and break less. Look for E-marker chips in USB-C cables that support 60–240W if you charge laptops. Buy from reputable brands. Check for certified standards like USB-IF compliance.
Fabric-braided cables can be durable, but stiff types can kink in tiny pouches. Smooth jacket cables coil cleaner in tight organizers. If you want the fastest data speeds, match cable ratings with your devices. This is a smart path for how to organize cables for travel that lasts years.
Labeling and Color Coding
Labels speed you up more than any other tip. Use small tag labels or heat-shrink markers. Add a color ring near one end. Write “Phone”, “Laptop”, “Camera”, “Watch”. Keep it simple.
Make a legend if you use colors. Blue = phone. Red = laptop. Green = camera. Pro move: Color-code by family member for family trips. These tricks make how to organize cables for travel intuitive for everyone.
Where to Put the Organizer in Your Bag
Put the in-flight pouch at the top of your personal item. Set the larger organizer in your carry-on’s main compartment. If you use one case only, keep it in an outer pocket you can reach in seconds.
Avoid deep bottom placement. You do not want to unload your whole bag at security. This simple tweak makes how to organize cables for travel work in the real world.
Cleaning and Care Tips
- Wipe the organizer with a damp cloth after dusty trips
- Air-dry if it gets wet; do not machine dry
- Check zippers for snags; trim loose threads
- Replace worn Velcro ties before they fail
These five-minute tasks extend the life of your kit. Your setup stays clean. Your cables last longer. And how to organize cables for travel remains easy over time.
Eco and Budget Tips
Buy fewer, better cables. They last longer and reduce waste. Share a family set of long cables in the hotel pouch. Use one good GaN charger for all devices.
Repurpose small zip pouches for niche items. Recycle failed cables at e-waste centers. This is a smarter, greener take on how to organize cables for travel.
FAQs Of how to organize cables for travel
How many cables should I pack for a weekend trip?
Pack one short and one long USB-C cable, plus any special cable you need. Add a small GaN charger. That covers most needs with little weight.
What is the best way to coil cables to avoid damage?
Use loose loops or the over-under method. Avoid tight bends. Secure with Velcro ties near the middle, not at strain reliefs.
Do I need separate pouches for flights and hotels?
It helps a lot. Keep an in-flight pouch accessible. Put hotel items deeper in your carry-on. It speeds you up at every step.
Can I bring power banks in checked luggage?
No. Keep power banks in your carry-on. Airlines require that for safety. Check airline rules before you fly.
What size organizer is best for minimalists?
A slim, double-layer pouch is ideal. It fits a charger, two cables, and earbuds without bulk. It’s easy to move between bags.
Final Verdict: Which Should You Buy?
If you carry multiple devices and want one bag to rule them all, the FYY Large Double-Layer Cable Organizer is my Top Pick. It makes how to organize cables for travel simple and predictable.
If you pack light and want a compact solution, go with the FYY Double-Layer Travel Cable Pouch. It covers daily needs and keeps how to organize cables for travel effortless.